How to Insert Signature in Word: Quick & Easy Guide (2025)

Do you want to know how to add a signature in Word? By doing so, you can personalize any letter or agreement that you've created using Microsoft's resident word processor. It'll also allow you to grant your consent or approval without the need to print and sign the document by hand.
In this post, you'll learn how to add a signature in Word — the quick and easy way! There won't be a need for you to do the roundabout task of scanning your document right after you've finished signing it on paper.

In Word, you have the choice to sign a document either by inserting a scanned version of your handwritten signature or by adding a signature line. You can also use the draw tool to insert your hand-drawn signature without using a pen.
Can You Sign a Word Document without Printing?
Even if you don't print a Word document, you can still sign it. Since the popular word processor has a built-in feature for adding signatures, you can get your documents signed quickly, minimizing any possible cause of delays such as running out of ink or paper. It also offers a more cost-effective solution since you can cut down on expenses while eliminating paperwork.

How to Add a Signature in Word?
If you know how to add a signature in Word, you can process your transactions faster without the hassle of printing documents on paper.
Assuming that you already have a scanned version of your handwritten signature, here's how you can add or insert it into a document in Word:
1. Go to the tab menu and click Insert.
2. Under the Insert menu group, click Pictures. At this point, you need to select your picture source. Since you're importing a scanned image of your handwritten signature, click Insert Picture From This Device.

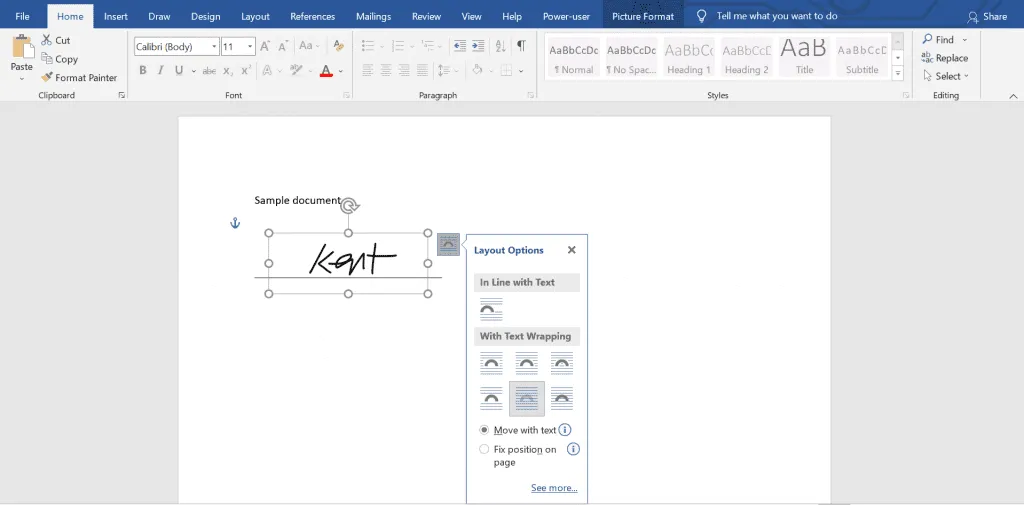
3. After adding your signature, you need to adjust its layout options. Otherwise, it won't appear correctly. Ideally, it should appear right above the signature line.
4. To adjust your signature's layout, click on it and select Layout Options. Hover over the available options and click the option that says "Behind Text" under With Text Wrapping.

5. Now, go ahead and place your signature right above the signature line. You may also adjust its size accordingly.
6. After signing the document, go to File and click Save. That's it!
If you carefully follow the six easy steps listed above, you'll be able to add or insert a scanned copy of your handwritten signature to any Word document.
What if you don't want to insert a scanned signature?
If you don't want to insert a scanned signature, you can always use the draw tool. With this tool, you'll be able to draw your signature right above the signature line. To use the draw tool, just click Draw from the tab menu. Select the black pen tool and set your desired pen color and thickness. Next, draw your signature using your digital pen or mouse. Don't forget to save the changes you've made to your document by clicking the Save option in the File tab.
How to Add a Digital Signature to a Word Document?
Adding a signature to a Word document won't automatically make it legally binding, whereas a digital signature can provide you with the means to preserve a document's integrity. In MS Word, you can digitally sign a document using your digital ID. Also known as a digital certificate, your digital ID contains information that can help verify your identity. You can obtain a digital ID from a certified Microsoft partner like IdenTrust and GlobalSign.
To digitally sign a document in Word, you need to right-click on the signature line then click Sign. A new window should appear. In it, type your name on the field provided or click Select Image to select a picture as your signature. Once done, click Sign and then click Yes to confirm.
Once signed, Word will automatically save the document to view-only mode.
How to Add a Legally Binding Signature to a Word Document Using Fill?
If for whatever reason, you're unable to secure a digital certificate from a certified Microsoft partner, you can always seek an alternative solution. With Fill, you'll still be able to add a legally-binding digital signature to any Word document.
Here's how:
1. Go to fillhq.com and sign up for an account.
2. Log in to your account and click Start Now.
3. If the document only requires your signature, without other parties involved, select Only You.

4. Upload your MS Word document by dragging and dropping it into the upload window.
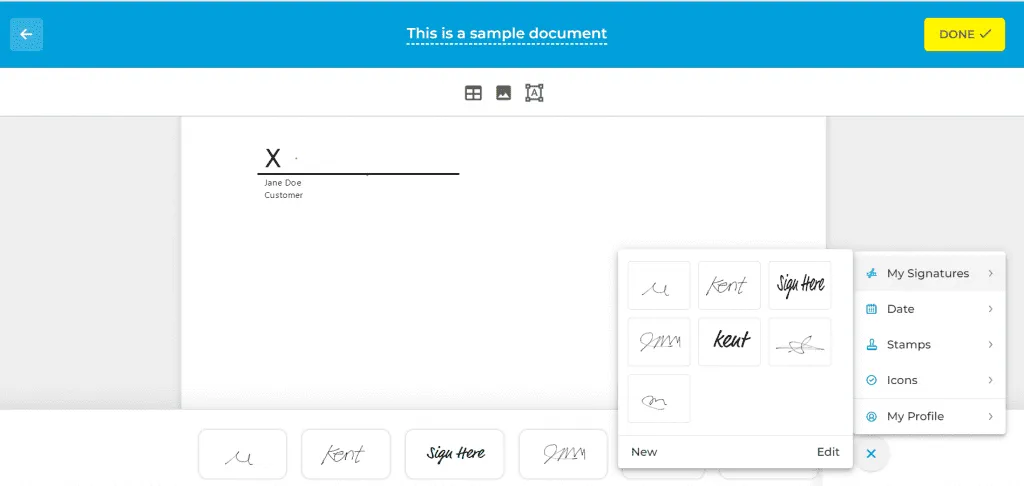
5. Click the (+) plus icon at the right side of the bottom menu and select My Signatures.

6. To create a signature, click New. Create your signature by either typing or drawing it. You can also upload a scanned version of your signature from your computer.
7. Save your signature and drag it into the signature field. Click Done as soon as you're finished.

Aside from creating a legally binding signature, Fill also secures your document with high-level encryption. It also prevents others from viewing your document or modifying your signature. Since every document signed using Fill has a unique hash code, it's easy to tell whether a signature is authentic or fake.
Why Choosing a Dedicated Solution Is the Smart Move
Word does a decent job if you’re only signing the occasional letter or form. But when documents need to be secure, professional, and legally valid, it leaves important gaps. Here’s why switching to a dedicated eSignature platform like Fill is the smarter choice:
Legal validity and compliance
Adding a scanned image of your handwritten signature in Word doesn’t guarantee that the document will hold up in legal or professional settings. Without a proper audit trail or certificate, it can easily be challenged. With Fill, every signature is encrypted and automatically linked to a verifiable trail, making your contracts compliant with standards like ESIGN, UETA, and HIPAA.
Security against tampering
Once you paste a signature into a Word file, anyone with editing access can copy, move, or even alter it. That means your signature — and the integrity of your document — isn’t fully protected. Fill prevents this by securing documents with encryption and locking them once they’ve been signed, ensuring your agreements remain authentic and untampered.
Efficiency in multi-signer workflows
Collecting signatures in Word usually means emailing documents back and forth, waiting for each person to add their part, and managing multiple versions of the same file. Fill streamlines this by allowing you to send one document to multiple signers at once, track progress in real time, and avoid version confusion altogether.
Scalability for business use
Word works fine for one-off signatures, but it’s not designed to handle frequent contract signing, client approvals, or HR paperwork. Fill gives teams the ability to manage templates, send out multiple requests, and organize signed files — all from one central platform — saving hours of repetitive work.
In short: Word can handle the basics, but for security, legal recognition, and workflow efficiency, a dedicated solution like Fill is the smarter choice.
Takeaway
By learning how to add a signature in Word, you can eliminate the need to print and sign documents on paper. You'll also be able to improve your level of productivity by getting rid of the tedious paperwork. When adding a signature into a Word document, you should keep in mind that it may not be considered legally binding unless you can provide a digital certificate to validate your identity.
If you need to create a legally binding signature for signing Word documents, use Fill. With our secure digital signature solution, you can seamlessly sign documents and improve your workflow. You can also keep track of your signature requests using real-time email alerts.
FAQS
Q1. How do I write my signature on a Word document?
You can use the Draw tool in Word to handwrite your signature using a mouse or digital pen. Just go to the Draw tab, select a pen style, and sign directly on the document.
Q2. How do I copy and paste a signature on a Word document?
If you already have a saved signature image, right-click it, copy, and then paste it into your Word document. Adjust its size and placement as needed.
Can I sign a Word document without printing?
Yes. With Word’s built-in features, you can insert a scanned signature, draw one, or add a digital ID without printing or scanning your document.
Related Stories
How to Sign PDFs on an iPhone or iPad Using Mobile Esignatures
How to Sign Google Docs, Sheets and Gmail Documents
How to Convert Signature to eSignature?
View our Privacy Policy for more info.

