It’s no secret that signing documents online provides plenty of advantages compared to a paper-based approach. For one, the document signing process is more simplified and straightforward, especially if more than two signees are involved. Things can quickly get out of hand and confusing when dealing with this task the old-fashioned way.
When you process your paperwork digitally, it’s a lot easier to set up a signing order to ensure that your document signing workflow goes smoothly and seamlessly. Today’s article will guide you through everything you need to know about signing orders.
Table of Contents
- What is a signing order?
- What are the different types of signing orders?
- How to set up a signing order with Fill?
- Key Takeaway

What is a signing order?
As the name suggests, a signing order allows you to determine the order in which two or more signees sign the document. Think of it as a distribution list. You can configure your document signing tool so that when Signee 1 signs the document, Signee 2 will automatically receive the appropriate document for signing, and so on. You can also set the signing order in a way that multiple parties can receive the paperwork at the same time and can simultaneously sign it.
This is a handy feature to have, especially if more than two parties are involved with the document signing. Doing it manually can get very confusing, and at the same time, it’s also very time-consuming monitoring the progress of your paperwork. When you use a signing order, you can set everything up in a few minutes and let your tool do its magic. You can just set up a notification to inform you if the document has already been signed by everyone involved.
What are the different types of signing orders?
There are more than a couple of types of signing orders that you can use to your advantage and depending on your specific requirements. Let’s go through each one of them quickly:
Simple Sequential Routing Order
A simple sequential routing order is a type of signing order that only sends the document as soon as the previous signers have signed them. As illustrated previously, Signee 2 can only receive and sign the paperwork only after Signee 1 has signed, and so on and so forth.
Parallel Routing Order
This type of signing order sends out your document to all the assigned signatories at the same time. Anyone can sign the document as soon as they receive them, without waiting for the other signees to accomplish their document signing task. In most document signing tools, this is the default setting if multiple signatures are needed for the document.
Hybrid Routing Order
There are also signing orders that are a mix of both routing orders. You can also set your signing order in a way that the same signee would receive the same file twice, one, when they have to sign it and then another when every party involved, has signed it.
How to set up a signing order with Fill?
Fill is an electronic signature application dedicated to simplifying how you sign and process your paperwork. Aside from providing you with many different ways of creating your electronic signature, Fill also boasts other features to make your document workflow a breeze.
For instance, Fill offers a real-time audit trail and log for better transparency. This feature will no longer have you second-guessing the progress of your paperwork. You do not have to constantly follow up with other signees to sign the document, as Fill will automatically send them reminders to ensure that your documents get signed promptly. Moreover, you can also receive instant notifications as soon as the other pirates have opened and signed the files.
Other features include unlimited document upload, unlimited document signature and smart filling, and of course, setting up a signing order. You can enjoy all these and more when you sign up with Fill.
Here’s how you can set up a signing order in Fiil:
Step 1. Sign in to your account. If you don’t have one, sign up using your email address.
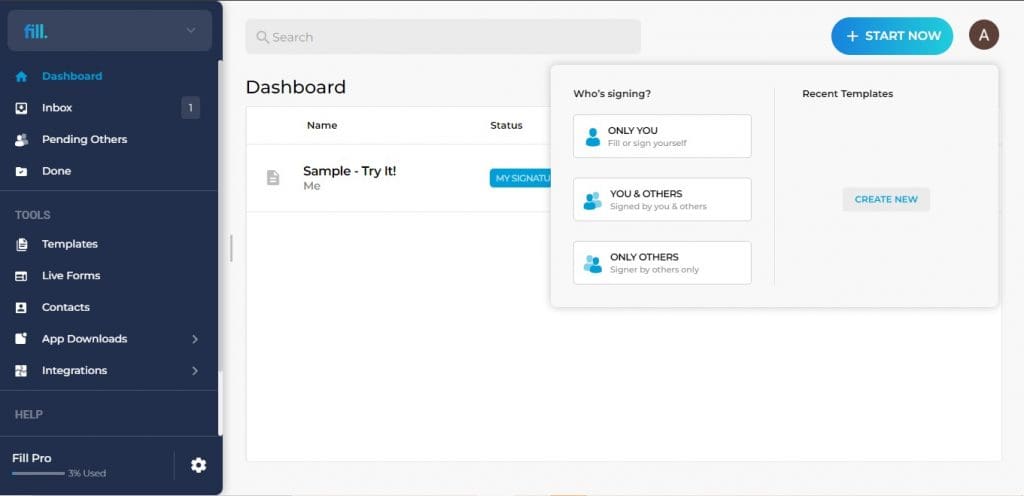
Step 2. On the dashboard, click the + Start Now button on the upper right-hand corner of the screen. Select between You & Others and Only Others. Choose the former if you also need to sign the documents and the latter if other parties are the only ones signing.
Step 3. Upload the file/s that need signing. You may also drag and drop the file into the box.
Step 4. Type the Document Name and the Document Type, then click Next.
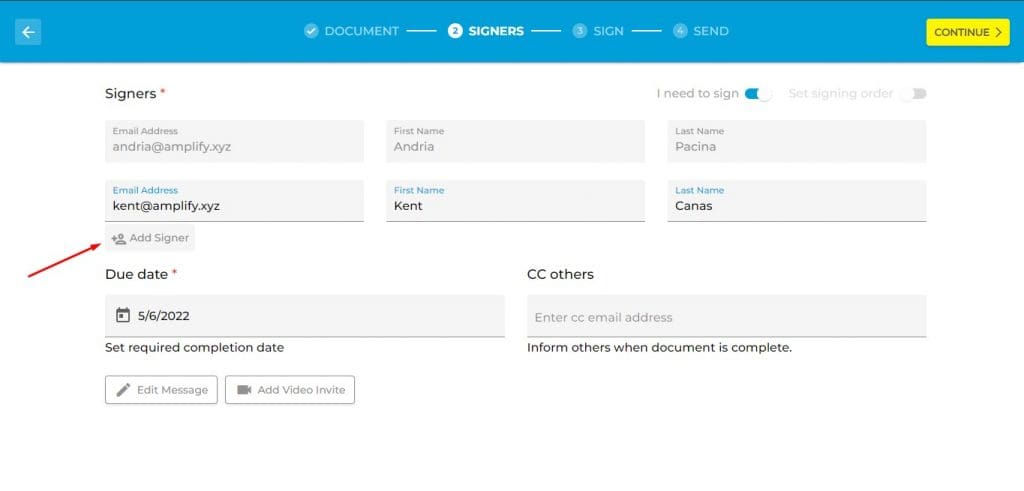
Step 5. Type the email addresses and the first and last names of the signer. To add more signers, click Add Signer button.
Step 6. Click the button beside Set Signing Order to enable the signing order functionality.
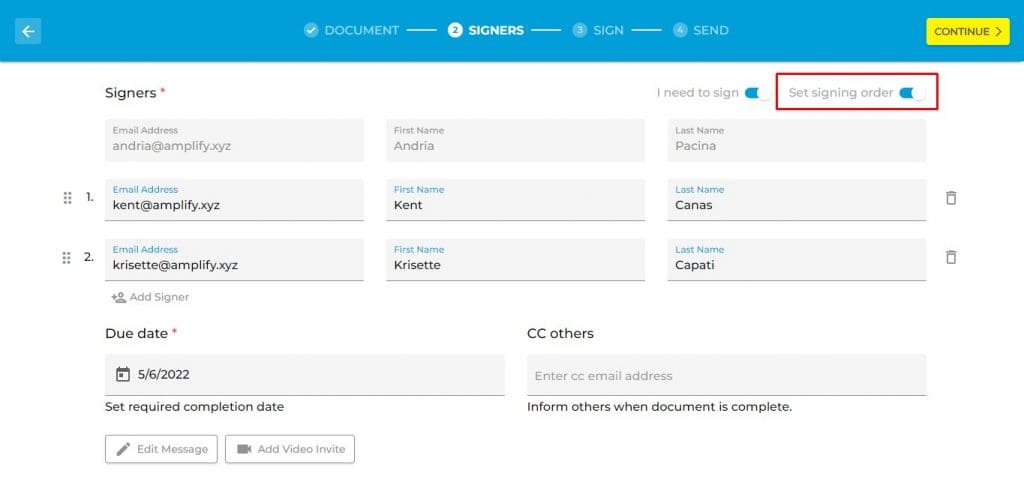
Note: You can only enable Signing Order functionalities if two or more signers are involved.
Step 7. To set up the appropriate sequence for your signing order, simply drag the contact by clicking the dots beside the number of the contacts.
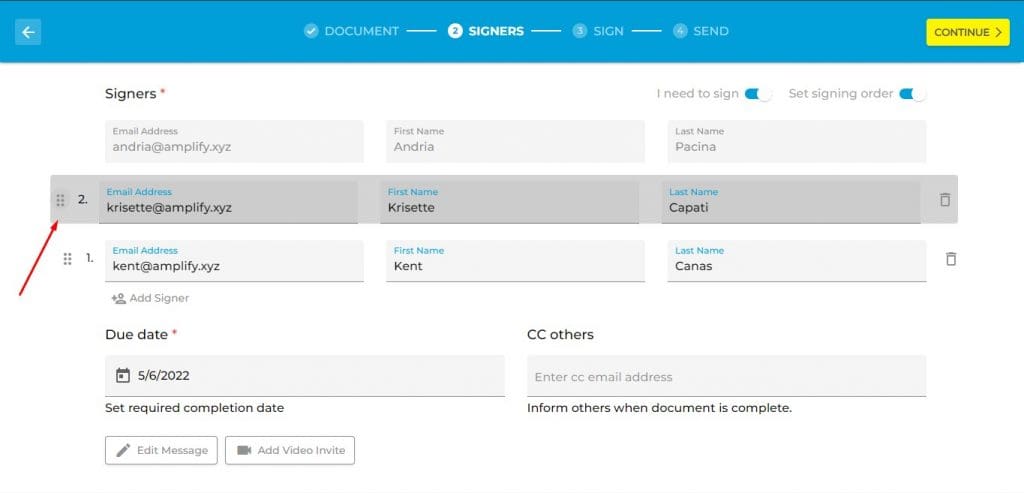
Step 9. Once the contracts are in the proper order, fill out the other necessary fields, such as the due date. You may also notify other contacts when the document has been duly signed. Simply type their corresponding email addresses.
Step 10. Review and sign the document, then click Continue.
Step 11. Add Fillable Fields for each signee. You can also test the form from the perspective of the signees to ensure that everything is in the right order.
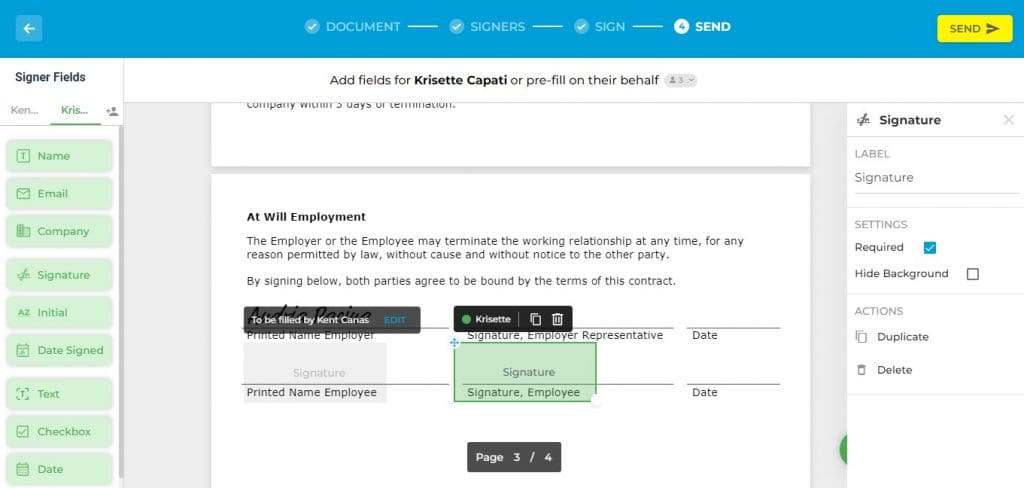
Step 12. Click Send. Your recipient should be able to receive the document through their email.
Key Takeaway
A signing order is a tool that allows you to have better control of your document workflow. It also automates the signing process as the tool can automatically send the documents depending on the configurations you chose. The best thing about this feature? It only takes you a few seconds to set it all up. So next time that you need to have multiple signees sign your paperwork, use this amazing feature on Fill.


